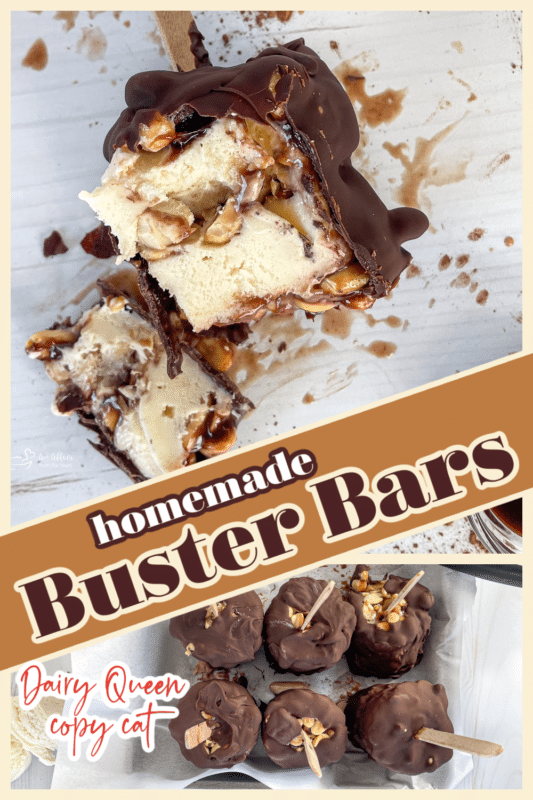
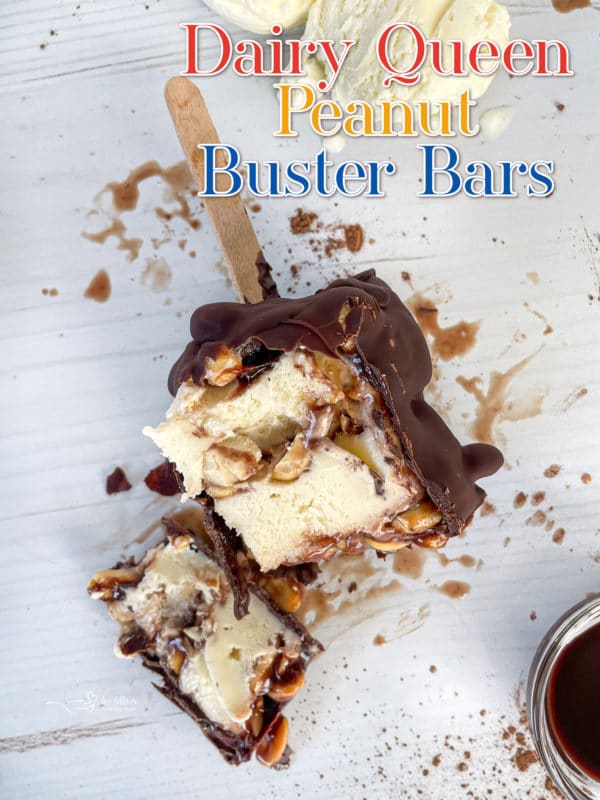
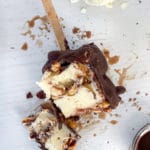
Homemade Buster Bars
As an Amazon Associate and member of other affiliate programs, I earn from qualifying purchases.
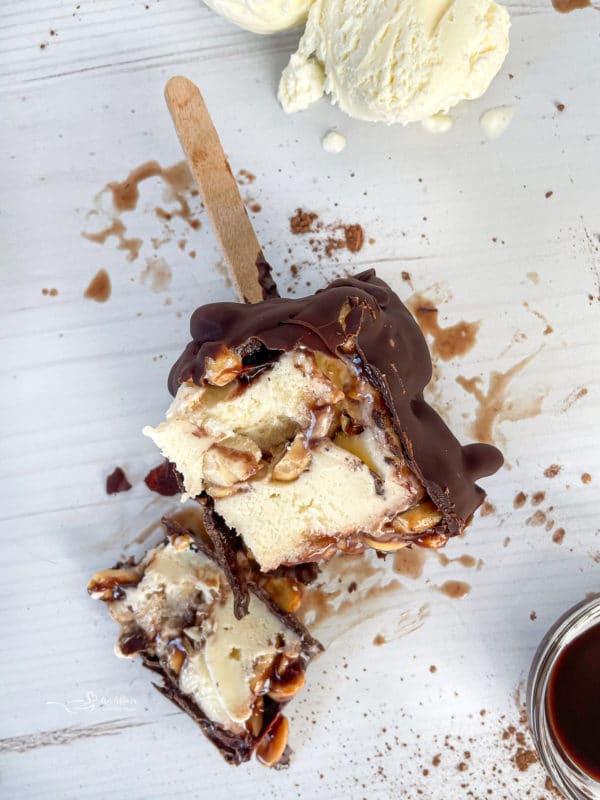
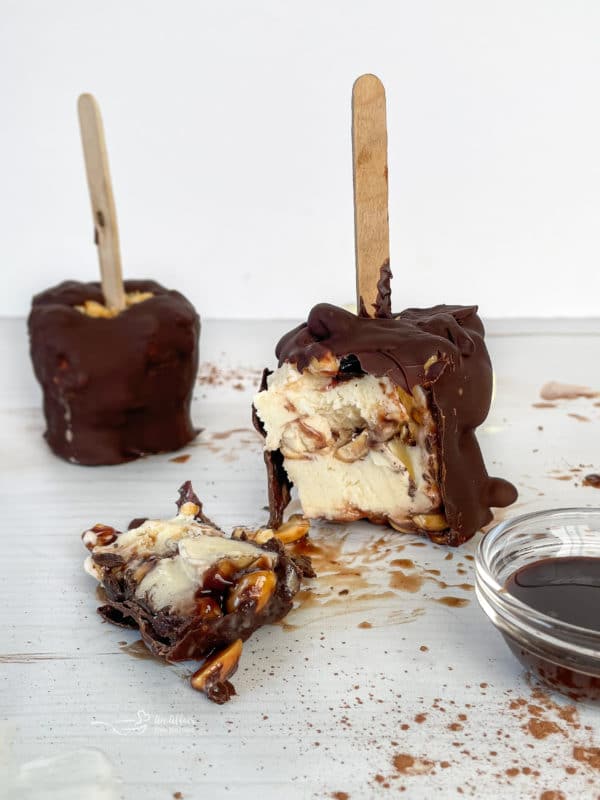
Indulge in layers of chocolate fudge, peanuts and vanilla ice cream in these Homemade Buster Bars!
If you’re anything like me, then you love a good excuse to eat anything made with chocolate and vanilla ice cream. Throw in some peanuts into the mix, and we’ll celebrate the whole occasion. This ice cream recipe is perfect if you’re looking for something to do during the weekend with the kids, and it’s the perfect treat for backyard activities!
Just like the well-known treat off the Dairy Queen menu, this copycat Buster Bars recipe is something you’ll remember for the rest of your life because it is that good. Filled with rich and gooey chocolate and creamy and nutty sweet flavors, these crunchy and sweet ice cream bars are a great way to cool off especially if you have a sweet tooth.
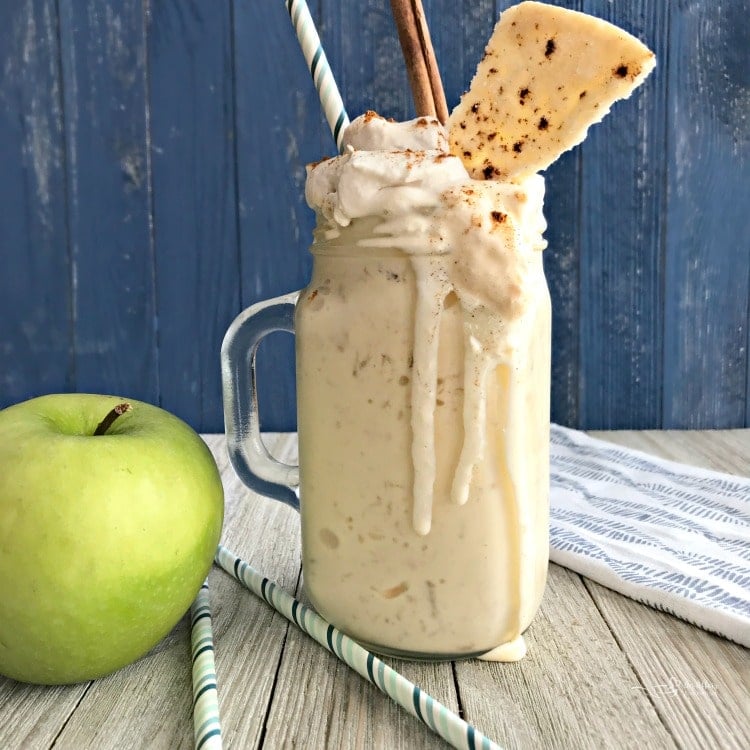
What’s better than making your very favorite frozen treat at home? In the mood for another DQ recipe? You’ll love my Dairy Queen Apple Pie Blizzard.
Buster Bars – My favorite since I was a kid
Making Buster Bars at Home
Why You’re Going to Love This Recipe
- Fun and Easy: You’re going to love how fun this recipe is! Such a joyous occasion to sit down and do this easy frozen treat at home with the family.
- Delicious: Bright and delicate in flavors, this homemade DQ Buster Bar recipe is just what you need for a warm and sunny day or when you’re just wanting to have something a little extra special.
- Perfect for Crowds: Got an occasion coming up and you need some easy treats? This easy recipe is a great way to please the crowds when you need something festive and sweet.
What’s in a Dairy Queen Buster Bar?
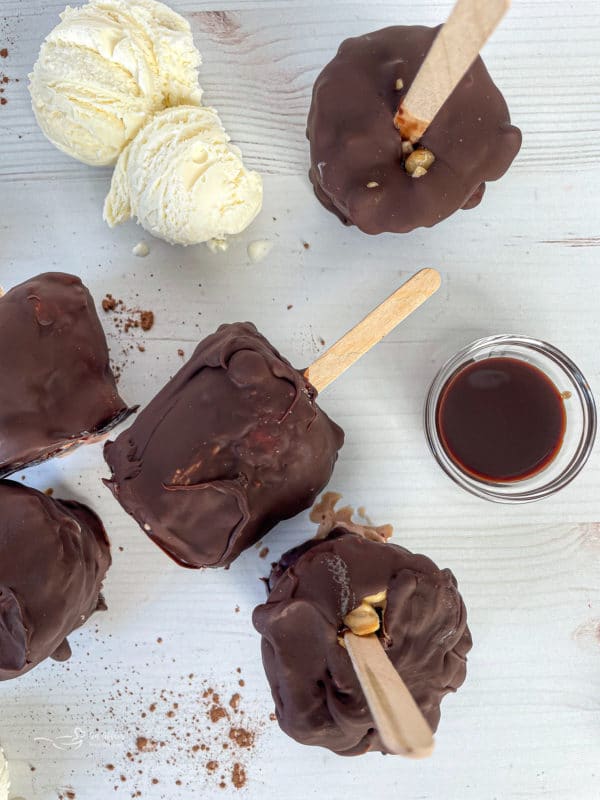
DQ Buster Bars are traditionally filled with smooth vanilla ice cream layered with hot fudge and peanuts. The treat is usually dipped in chocolate and topped with more nuts for an out-of-this-world flavor.
Buster Bar vs. Dilly Bar
Buster Bars are different than Dilly Bars because Buster Bars contain peanuts and hot fudge in the middle. Sort of similar because they’re both yummy frozen treats, but the flavors are oh, so different!
Ingredients & Supplies in Buster Bars
Plastic cups – Used for the molds for these Buster Bars! I like the 9 ounce size.
Popsicle sticks – Go for the wide popsicle sticks. A lot easier to work with!
Peanuts – I used Spanish peanuts for this recipe because they’re so easy to work with and make the flavor THAT much more amazing!
Fudge – You’ll need a jar of Hot Fudge Topping, chocolate sauce, or Hot Fudge for this recipe. I like to use the jar of fudge I find at the local market.
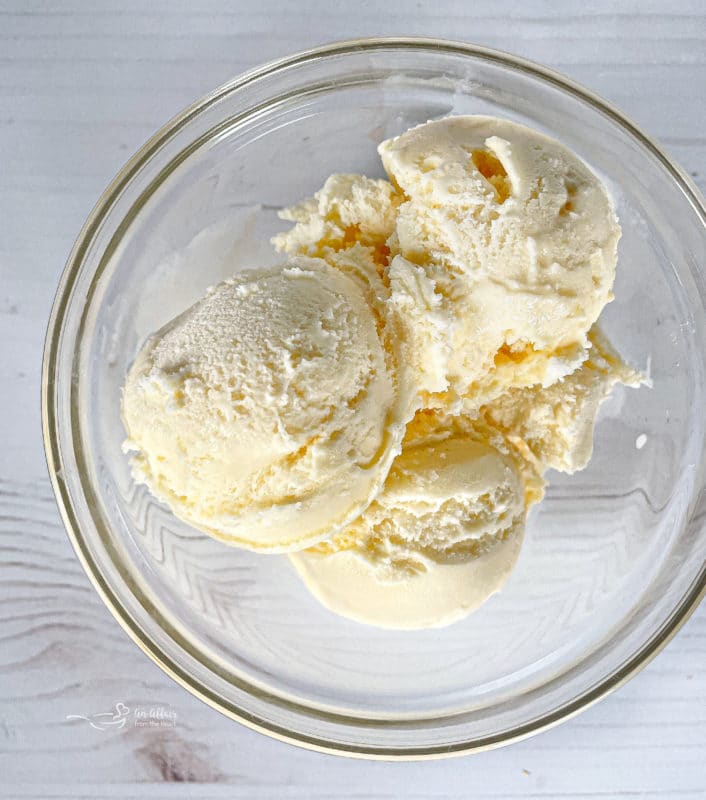
Ice Cream – I like to use a tub of vanilla ice cream for this recipe. You can use any type of vanilla your heart desires! Homemade or storebought; either way, these Buster Bars are going to taste amazing.
Chocolate chips – I like to use a bag of semi-sweet chocolate chips for this recipe, but can use any type of chocolate chips you desire! Yes, even dark chocolate.
Oil – Oil is used to melt down the chocolate chips
How to Make Dairy Queen Buster Bars at Home
With just a handful of steps, you will have homemade Buster Bars ready in no time! Scroll to the recipe card for more detailed steps.
Step 1
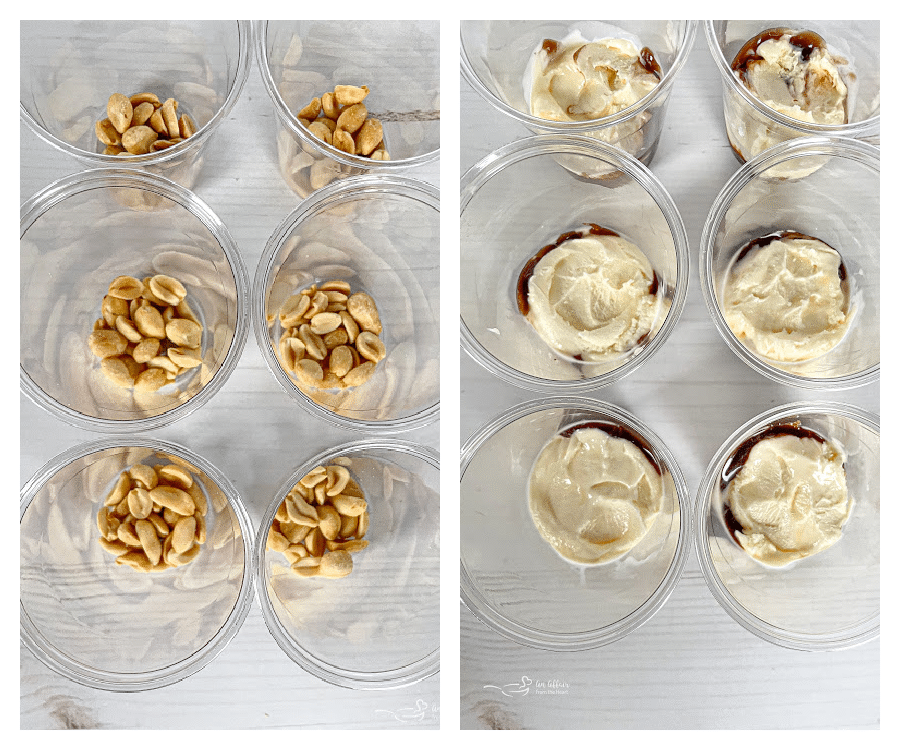
Assemble Layers: First, line the cups on the work surface. Next, slowly spoon in the peanuts, then drizzle the peanuts with hot fudge. After that, place a scoop of ice cream over the nuts and fudge and firmly press down.
Step 2
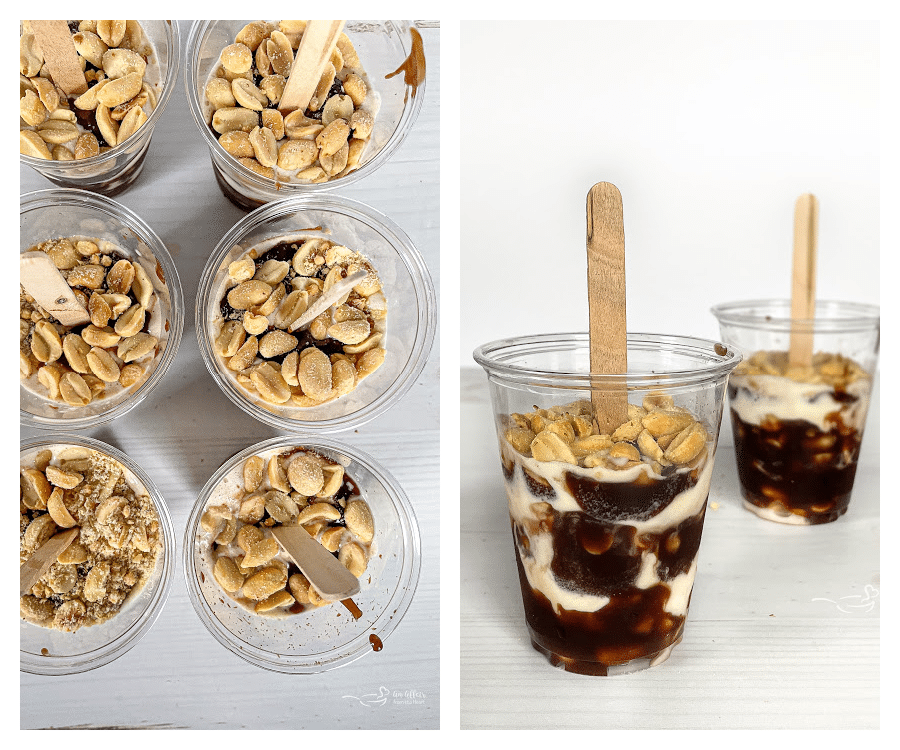
Layer with More Chocolate and Peanuts: After that, fill the ice cream with more hot fudge and peanuts. Cover all the surfaces and make it extra nutty and filled with chocolate! Then, place another scoop of ice cream onto the additional fudge layer and top with more peanuts if desired.
Step 4
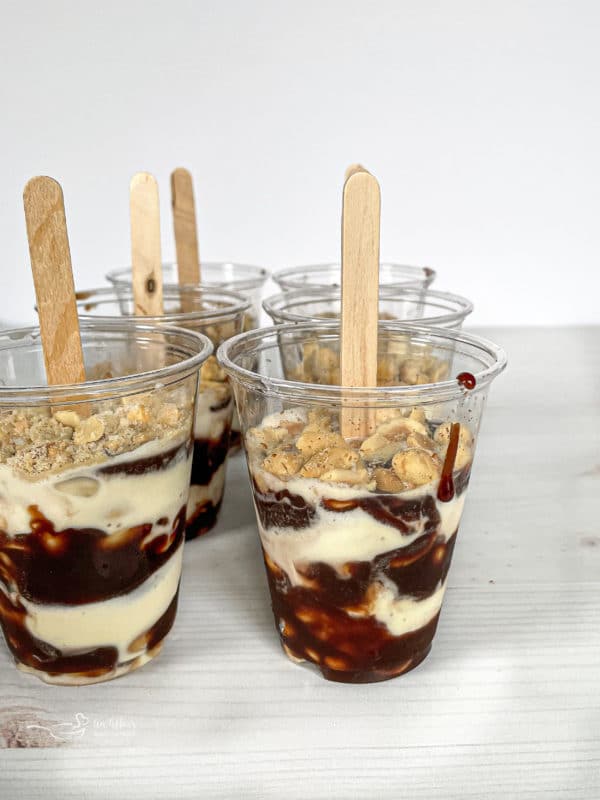
Insert Popsicle Stick & Freeze: Finally, insert the popsicle stick into the ice cream cups and place it in the freezer and freeze for at least three to four hours or overnight. You can even make these in advance!
Step 5
Melt Chocolate: Next, place oil and chocolate chips in a microwave-safe bowl. Melt the chocolate chips in 30-second intervals until lightly melted. Make sure to stir the chocolate chips until softened.
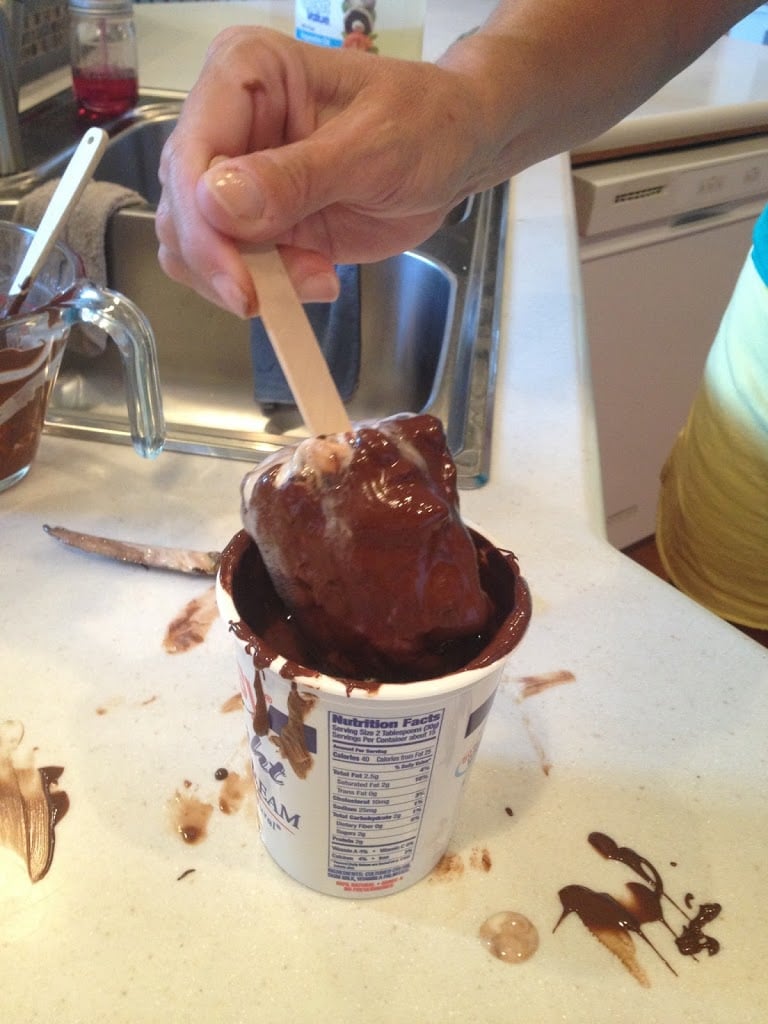
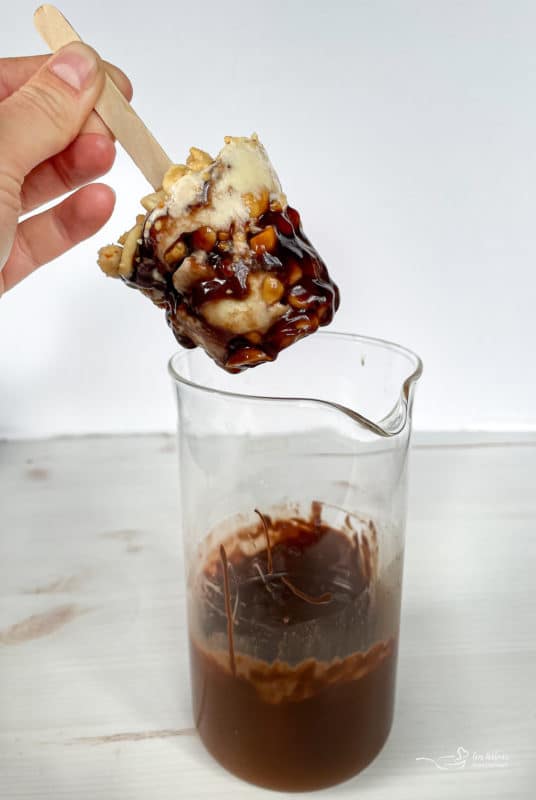
Dip: Remove the frozen Buster Bars from the freezer and get ready to dip them into the melted chocolate. Gently, remove the cups from the outside of the ice cream mixture: you may have to use a butter knife to loosen the edges. Then, holding the popsicle stick, dunk the homemade Buster Bar into the chocolate and gently swirl around until it’s fully coated with chocolate.
Step 6
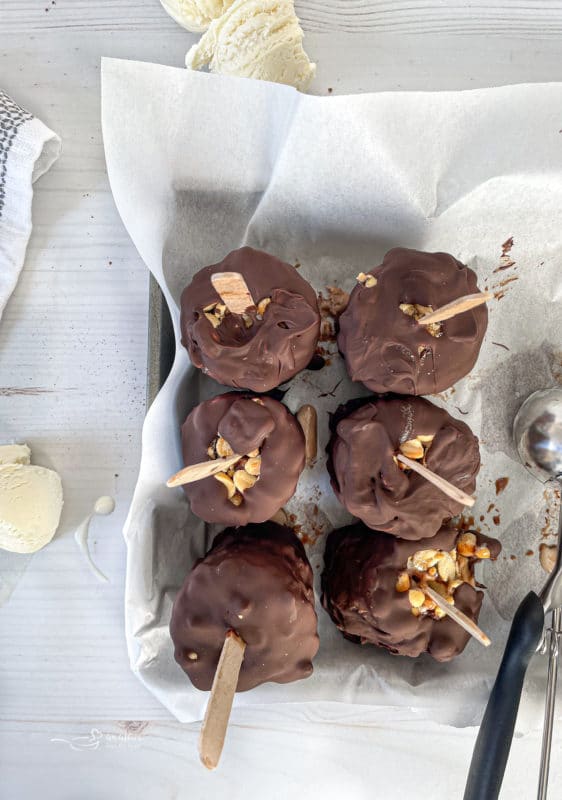
Place Back in Freezer: Finally, place the chocolate-dipped Buster Bars on a cookie sheet lined with waxed paper, and place them back in the freezer for at least an hour. Remove the hardened chocolate treats from the freezer and enjoy!
LOVE IT? PIN IT!
Don’t forget to save this homemade Buster Bars recipe to find it easily! Pin it to your favorite Pinterest recipe board before you go!
Tips
- Be sure to firmly pack the ice cream. The popsicle sticks will become loose if the ice cream isn’t packed tight enough.
- To twist things up, you could use chocolate ice cream or any other type of ice cream you would like.
- Store in the freezer for up to three months.
More Frozen Treats to Enjoy
I have an entire section on my blog dedicated to Ice Cream & Frozen Treats! Make sure you give them a peek!
- Grasshopper Pie Ice Cream
- Homemade Drumsticks
- Blackberry Swirl Ice Cream
- Grape Nut Ice Cream
- Vanilla Caramel Swirl Ice Cream Recipe
- Snow Ice Cream
- Shirley Temple Float
- Disney’s Pineapple Dole Whip
Let’s make some Peanut Buster Bars!! 
Homemade Buster Bars
Equipment
Ingredients
- 6 plastic small plastic cups
- 6 Popsicle sticks
- 1/2 gallon of vanilla ice cream or frozen yogurt
- Spanish peanuts
- 1 jar of hot fudge
- 12 ounces of semi-sweet chocolate chips
- 3 Tablespoons of vegetable oil
- Line your cups up in the bottom spoon about 1/2 T of peanuts, then drizzle with about 1/2 T of hot fudge.
Instructions
- Line your cups up, in the bottom spoon about 1/2 Tablespoon of peanuts, then drizzle with about 1/2 Tablespoon of hot fudge.
- Place a scoop of ice cream over that, and press it down firmly.
- Top that again with about 1 heaping Tablespoon of hot fudge, smearing it on top of the ice cream, top with 1 Tablespoon peanuts.
- Next more ice cream, press it down, more hot fudge and peanuts.
- Place a Popsicle stick in the middle of the cup, and place the cups in the freezer.
- We froze ours for 24 hours.
- After they are good and frozen, you can begin the dipping process.
- Pour your chocolate chips and oil into a microwave-safe bowl. Make sure it's pretty tall in order to be able to dunk the frozen Ice cream all of the way in and get it on the bottom by the stick. Melt in 30-second intervals stirring in between until chocolate is smooth. Let it stand for just a minute, so it isn’t super hot.
- Lightly squeeze the outside of the cup to release the ice cream. I had to run a butter knife around the outside to loosen it up.
- Dunk it into the chocolate, and hold up for a second, giving it a slow twirl to distribute chocolate and let the excess run off.
- Place on a cookie sheet lined with waxed paper, and place back in the freezer.
Notes
Nutrition
This recipe was originally posted on July 12, 2013. It was updated to improve user experience and re-shared on May 17, 2021.
recipe adapted from Eat at Home
Mmmm, I really need to get the stuff this weekend to make these. YUM!
I would love to hear what you think!! 🙂 Michaela AAFTH
Love these!!!!! Thank you! <3 and hugs sweet friend!
Thanks, friend!! Love that they inspired you to make that cake!! Which has inspired ME to make that cake!! 😉
You are my hero…my bestest friend forever. Thank you!
I’m going to make these with my grandson. We are going to love them.
I love doing copycat recipes! This looks perfect for summer.
I made these yesterday and it was a hit! I have to double the recipe next time because my family keeps asking for more! Such a yummy treat!
This looks amazing! Ice cream, chocolate and nuts, a perfect combination for a frozen treat!
These are going to be perfect for this summer and save some money making them here.
Totally bookmarked! Buster bars are my fave treat — can’t wait to make them this summer!
Chocolate, Ice Cream and Peanuts! You are speaking my language! These look delicious and super simple to make. Can’t wait to try them.
Never tried something like this before. These bars are making me drool. I will try this soo .
These look amazing and perfect for summer! So excited to make these bars! My hubby is going to love these after working in the yard!
This is the absolute perfect summer treat!! They were also so easy to make and so decadent!! My kids devoured them 🙂